Android Studio2.2で、急にビルドができなくなった。
Runで実行する「app」がUnknownになって下記エラーになっている。
Error running app: Unknown run configuration type AndroidRunConfigurationType
Runで実行する「app」がUnknownになって下記エラーになっている。
Error running app: Unknown run configuration type AndroidRunConfigurationType
全部縦固定していたはずなのに、なぜかipadだけランドスケープ(横画面)で起動する。。
ちょっとおかしいと思って色々調べたメモ
するとUIWindowでサイズを取得すると縦画面のサイズと違うサイズが取得される、
むしろ、縦より横のサイズが大きい!
横画面のサイズになっているっぽい。。
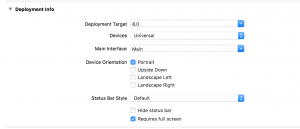
DevicesをiPhoneにし、Portrait のみでも結果同じだった。
画面サイズを取得して、UIViewとか、UIを作っているところが、
予想外の動きにになりまくり。。
設定画面のGeneralの
設定画面のDevicesでプルダウン切り替えでipadの内容が保持されているのはあとから知ったw
info.plist
〜
<key>UISupportedInterfaceOrientations</key>
    <array>
        <string>UIInterfaceOrientationPortrait</string>
    </array>
    <key>UISupportedInterfaceOrientations~ipad</key>
    <array>
        <string>UIInterfaceOrientationPortrait</string>
    </array>
</dict>
</plist>
〜

ただ、iPadでは、マルチタスキング機能というものがあって(Slide OverやSplitView)が使えなくなってしまうようなのでご注意を。
参考記事さま http://qiita.com/jollyjoester/items/c8bb1592d01fdef663f9
$ adb devices
$ adb -s emulator-5556 shell
$ ls -la /data/data/アプリのパッケージ名/files/test.png
※OSバージョンや端末によって使えるlinuxコマンドが限られていそう
$ adb -s emulator-5556 pull /data/data/アプリのパッケージ名/files/test.png
参考:http://stackoverflow.com/questions/39761453/no-shortcut-for-ddms-in-android-studio-2-2
ありがとうございます!!
Android2.2にアップデートしてから、
DDMSの見方がわからくなってしまってので忘れないようにメモ。。
zxingでQRコードを読み取るアプリを作っていたのですが、
特定の端末だけカメラ起動時に、
logcatで確認してみると、、
Attempt to invoke virtual method 'android.hardware.Camera$Parameters android.hardware.Camera.getParameters()' on a null object reference
こういうエラーが。。zxingライブラリの中身でエラー履いてて、
どうしようも。。
でズバリ解決方法は、
ライブラリアップデート!!!
build.gradle(app)
dependencies {
〜
    compile 'com.journeyapps:zxing-android-embedded:3.3.0'
〜
}
あと、androidOS6からか、、カメラの扱う許可ダイアログが表示された。。
参考サイト:
http://stackoverflow.com/questions/37685141/nullpointerexception-with-zxing-library-for-qr-scanning-android-app
https://github.com/journeyapps/zxing-android-embedded
無料SSLで有名なLet’s encryptを、利用させて頂いており、
それの有効期限3ヶ月と短く、その有効期限が迫ったので、更新対応した際のメモ
導入はほぼ200%こちらのサイト様を参考にさせていただきましたm( _ _ ; )m
http://qiita.com/sak_2/items/ff835b669c0a7e110b09
そもそも自動化しろよって話ですが、
手動で更新した際のメモw
$ cd /etc/letsencrypt/live/blog.4star.link/
cert.pem       chain.pem      fullchain.pem  privkey.pem
cert.pem -> ../../archive/blog.4star.link/cert1.pem
chain.pem -> ../../archive/blog.4star.link/chain1.pem
fullchain.pem -> ../../archive/blog.4star.link/fullchain1.pem
privkey.pem -> ../../archive/blog.4star.link/privkey1.pem
$ ./letsencrypt-auto renew
$ ./letsencrypt-auto renew
Saving debug log to /var/log/letsencrypt/letsencrypt.log

-------------------------------------------------------------------------------
Processing /etc/letsencrypt/renewal/blog.4star.link.conf
-------------------------------------------------------------------------------
Cert is due for renewal, auto-renewing...
Starting new HTTPS connection (1): acme-v01.api.letsencrypt.org
Renewing an existing certificate
Performing the following challenges:
tls-sni-01 challenge for blog.4star.link

-------------------------------------------------------------------------------
Port 443 is already in use by another process. This will prevent us from binding
to that port. Please stop the process that is populating the port in question
and try again.  For automated renewal, you may want to use a script that stops
and starts your webserver. You can find an example at
https://certbot.eff.org/docs/using.html#renewal . Alternatively you can use the
webroot plugin to renew without needing to stop and start your webserver.
-------------------------------------------------------------------------------
Cleaning up challenges
Attempting to renew cert from /etc/letsencrypt/renewal/blog.4star.link.conf produced an unexpected error: At least one of the (possibly) required ports is already taken.. Skipping.

All renewal attempts failed. The following certs could not be renewed:
  /etc/letsencrypt/live/blog.4star.link/fullchain.pem (failure)
1 renew failure(s), 0 parse failure(s)
必要なポートが既に使われているらしい。
$ netstat -tanplsof -i:80
nginxで使っているので一旦停止(サービスが止まるので注意!
$ service nginx stop
$ ./letsencrypt-auto renew
Saving debug log to /var/log/letsencrypt/letsencrypt.log

-------------------------------------------------------------------------------
Processing /etc/letsencrypt/renewal/blog.4star.link.conf
-------------------------------------------------------------------------------
Cert is due for renewal, auto-renewing...
Starting new HTTPS connection (1): acme-v01.api.letsencrypt.org
Renewing an existing certificate
Performing the following challenges:
tls-sni-01 challenge for blog.4star.link

-------------------------------------------------------------------------------
Port 443 is already in use by another process. This will prevent us from binding
to that port. Please stop the process that is populating the port in question
and try again.  For automated renewal, you may want to use a script that stops
and starts your webserver. You can find an example at
https://certbot.eff.org/docs/using.html#renewal . Alternatively you can use the
webroot plugin to renew without needing to stop and start your webserver.
-------------------------------------------------------------------------------
Cleaning up challenges
Attempting to renew cert from /etc/letsencrypt/renewal/blog.4star.link.conf produced an unexpected error: At least one of the (possibly) required ports is already taken.. Skipping.

All renewal attempts failed. The following certs could not be renewed:
  /etc/letsencrypt/live/blog.4star.link/fullchain.pem (failure)
1 renew failure(s), 0 parse failure(s)
また同じエラーが。。。
。。。。
。。。。。
何度か同じエラーがでたあと、
$ ./letsencrypt-auto renew
Saving debug log to /var/log/letsencrypt/letsencrypt.log

-------------------------------------------------------------------------------
Processing /etc/letsencrypt/renewal/blog.4star.link.conf
-------------------------------------------------------------------------------
Cert is due for renewal, auto-renewing...
Starting new HTTPS connection (1): acme-v01.api.letsencrypt.org
Renewing an existing certificate
Performing the following challenges:
tls-sni-01 challenge for blog.4star.link
Waiting for verification...
Cleaning up challenges
Generating key (2048 bits): /etc/letsencrypt/keys/0001_key-certbot.pem
Creating CSR: /etc/letsencrypt/csr/0001_csr-certbot.pem

-------------------------------------------------------------------------------
new certificate deployed without reload, fullchain is
/etc/letsencrypt/live/blog.4star.link/fullchain.pem
-------------------------------------------------------------------------------

Congratulations, all renewals succeeded. The following certs have been renewed:
  /etc/letsencrypt/live/blog.4star.link/fullchain.pem (success)
で
$ service nginx start
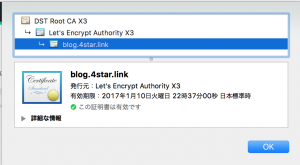
証明書が更新されていない。。。。
生成されたpemファイルをチェック。。。
pemが複数連番になってつくられている、、
/archive/blog.4star.link/cert1.pem
/archive/blog.4star.link/cert2.pem
僕の場合archiveのファイルをnginx.confに指定していたので、
生成された番号のつきの名前の方を変更。。
人力でファイルを変更。。。w
nginx.conf
ssl_certificate /etc/letsencrypt/archive/blog.4star.link/fullchain**2**.pem;
ssl_certificate_key /etc/letsencrypt/archive/blog.4star.link/privkey**2**.pem;
ssl_trusted_certificate /etc/letsencrypt/archive/blog.4star.link/fullchain**2**.pem;
あとは、
せいや。。。!!!!
$ service nginx start

こんなエラーが。。w
Cannot assign value of type '(_, Bool, Array<_>!, NSError!) -> ()' to type 'UIActivityViewControllerCompletionWithItemsHandler?'
UIActivityViewControllerでシェア機能を実装していると、
皆さんぶつかると思うので対応方法。
英語の記事はめちゃくちゃあったのですが、何故か日本の記事はなかったので一応。
activityVC.completionWithItemsHandler = {
    (s: String?, complete: Bool, items: [AnyObject]?, err:NSError?) -> Void in
    if (complete) {
        printf("完了")
    }else{
        printf("失敗")
    }
}
やっほい
最近xcodeをxcode8にして、色々かわりすぎて戸惑いを隠せない、
小心者筆者です。。
いままでxcode7.3かな?で動かしていたRealm Swiftが使えなくなったのでメモ。
前提として、xcode8でswift2.3を使った場合です。
Podfileで下記のようにrealmをインストールしていたのですが
pod 'RealmSwift'
$ pod install
/System/Library/Frameworks/Ruby.framework/Versions/2.0/usr/lib/ruby/2.0.0/universal-darwin15/rbconfig.rb:213: warning: Insecure world writable dir /Applications/Cocos/tools/ant/bin in PATH, mode 040777
Analyzing dependencies
Pre-downloading: `RealmSwift` from `https://github.com/realm/realm-cocoa.git`, branch `master`, submodules `true`
[!] Unable to satisfy the following requirements:

- `Realm (= 2.0.2)` required by `RealmSwift (2.0.2)`

None of your spec sources contain a spec satisfying the dependency: `Realm (= 2.0.2)`.

You have either:
 * out-of-date source repos which you can update with `pod repo update`.
 * mistyped the name or version.
 * not added the source repo that hosts the Podspec to your Podfile.

Note: as of CocoaPods 1.0, `pod repo update` does not happen on `pod install` by default.
pod 'Realm', :git => 'https://github.com/realm/realm-cocoa.git', :branch => 'master', :submodules => true
pod 'RealmSwift', :git => 'https://github.com/realm/realm-cocoa.git', :branch => 'master', :submodules => true
はいそれだけ。っす
ImageView.setColorFilter(Color.BLACK,PorterDuff.Mode.SRC_ATOP);

ImageView.setColorFilter(R.color.my_color_silhouette,PorterDuff.Mode.SRC_ATOP);
R.color.my_color_silhouetteのxmlファイルも一応
colors.xml
<color name="my_color_silhouette">#ee000000</color>

↑ これだと思うように透過されません。alphaをffにしても透過された状態になる。。
ImageView.setColorFilter(Color.parseColor("#ee000000"),PorterDuff.Mode.SRC_ATOP);

無事イメージどおりの透過具合になりました!

<RelativeLayout
    android:layout_width="wrap_content"
    android:layout_height="wrap_content"
    >

    <!--背景画像-->
    <ImageView
        android:layout_width="match_parent"
        android:layout_height="wrap_content"
        android:gravity="left"
        android:id="@+id/hukidasi_image"
        app:srcCompat="@drawable/ic_haikeigazou"
        />

    <!--中央に載せるテキスト画像-->
    <TextView
        android:layout_centerInParent="true"
        android:layout_width="match_parent"
        android:layout_height="wrap_content"
        android:textAlignment="center"
        android:gravity="center"
        android:text="中央画像"
        />

</RelativeLayout>