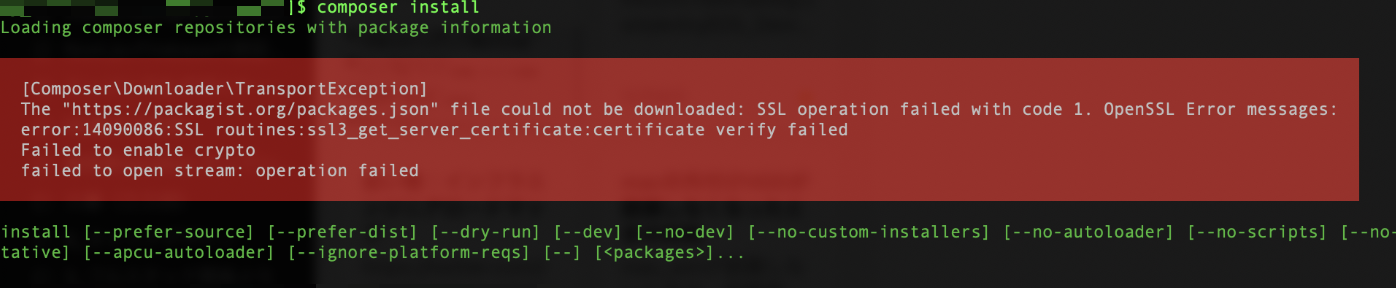
[Composer\Downloader\TransportException]
  The "https://packagist.org/packages.json" file could not be downloaded: SSL operation failed with code 1. OpenSSL Error messages:
  error:14090086:SSL routines:ssl3_get_server_certificate:certificate verify failed
  Failed to enable crypto
  failed to open stream: operation failed
$ ./letsencrypt-auto renew
Saving debug log to /var/log/letsencrypt/letsencrypt.log

-------------------------------------------------------------------------------
Processing /etc/letsencrypt/renewal/blog.4star.link.conf
-------------------------------------------------------------------------------
Cert is due for renewal, auto-renewing...
Starting new HTTPS connection (1): acme-v01.api.letsencrypt.org
Renewing an existing certificate
Performing the following challenges:
tls-sni-01 challenge for blog.4star.link

-------------------------------------------------------------------------------
Port 443 is already in use by another process. This will prevent us from binding
to that port. Please stop the process that is populating the port in question
and try again.  For automated renewal, you may want to use a script that stops
and starts your webserver. You can find an example at
https://certbot.eff.org/docs/using.html#renewal . Alternatively you can use the
webroot plugin to renew without needing to stop and start your webserver.
-------------------------------------------------------------------------------
Cleaning up challenges
Attempting to renew cert from /etc/letsencrypt/renewal/blog.4star.link.conf produced an unexpected error: At least one of the (possibly) required ports is already taken.. Skipping.

All renewal attempts failed. The following certs could not be renewed:
  /etc/letsencrypt/live/blog.4star.link/fullchain.pem (failure)
1 renew failure(s), 0 parse failure(s)
必要なポートが既に使われているらしい。
ポートチェック
$ netstat -tanplsof -i:80
nginxで使っているので一旦停止(サービスが止まるので注意!
$ service nginx stop
再びrenew!
$ ./letsencrypt-auto renew
Saving debug log to /var/log/letsencrypt/letsencrypt.log

-------------------------------------------------------------------------------
Processing /etc/letsencrypt/renewal/blog.4star.link.conf
-------------------------------------------------------------------------------
Cert is due for renewal, auto-renewing...
Starting new HTTPS connection (1): acme-v01.api.letsencrypt.org
Renewing an existing certificate
Performing the following challenges:
tls-sni-01 challenge for blog.4star.link

-------------------------------------------------------------------------------
Port 443 is already in use by another process. This will prevent us from binding
to that port. Please stop the process that is populating the port in question
and try again.  For automated renewal, you may want to use a script that stops
and starts your webserver. You can find an example at
https://certbot.eff.org/docs/using.html#renewal . Alternatively you can use the
webroot plugin to renew without needing to stop and start your webserver.
-------------------------------------------------------------------------------
Cleaning up challenges
Attempting to renew cert from /etc/letsencrypt/renewal/blog.4star.link.conf produced an unexpected error: At least one of the (possibly) required ports is already taken.. Skipping.

All renewal attempts failed. The following certs could not be renewed:
  /etc/letsencrypt/live/blog.4star.link/fullchain.pem (failure)
1 renew failure(s), 0 parse failure(s)
また同じエラーが。。。
さらにもう一回!
どりゃっっxさらにもう一回!
ぐああーーっしゃいさらにもう1っかい!
。。。。
。。。。。
何度か同じエラーがでたあと、
$ ./letsencrypt-auto renew
Saving debug log to /var/log/letsencrypt/letsencrypt.log

-------------------------------------------------------------------------------
Processing /etc/letsencrypt/renewal/blog.4star.link.conf
-------------------------------------------------------------------------------
Cert is due for renewal, auto-renewing...
Starting new HTTPS connection (1): acme-v01.api.letsencrypt.org
Renewing an existing certificate
Performing the following challenges:
tls-sni-01 challenge for blog.4star.link
Waiting for verification...
Cleaning up challenges
Generating key (2048 bits): /etc/letsencrypt/keys/0001_key-certbot.pem
Creating CSR: /etc/letsencrypt/csr/0001_csr-certbot.pem

-------------------------------------------------------------------------------
new certificate deployed without reload, fullchain is
/etc/letsencrypt/live/blog.4star.link/fullchain.pem
-------------------------------------------------------------------------------

Congratulations, all renewals succeeded. The following certs have been renewed:
  /etc/letsencrypt/live/blog.4star.link/fullchain.pem (success)