nginxをrestartしたら「Failed to start The nginx HTTP and reverse proxy server.
」というエラーが。

nginxのconfファイルを見直したり、php-fpmの再起動や、selinuxの無効化等色々試したがエラーは消えず、

# systemctl status nginx.service
● nginx.service - The nginx HTTP and reverse proxy server
   Loaded: loaded (/usr/lib/systemd/system/nginx.service; enabled; vendor preset: disabled)
  Drop-In: /usr/lib/systemd/system/nginx.service.d
           └─php-fpm.conf
   Active: failed (Result: exit-code) since Fri 2023-11-17 23:34:13 JST; 18s ago
  Process: 1319317 ExecReload=/bin/kill -s HUP $MAINPID (code=exited, status=0/SUCCESS)
  Process: 1501969 ExecStart=/usr/sbin/nginx (code=exited, status=1/FAILURE)
  Process: 1501968 ExecStartPre=/usr/sbin/nginx -t (code=exited, status=0/SUCCESS)
  Process: 1501966 ExecStartPre=/usr/bin/rm -f /run/nginx.pid (code=exited, status=0/SUCCESS)
 Main PID: 2275107 (code=exited, status=0/SUCCESS)

〜〜〜
11月 17 23:34:13 118-27-106-164 systemd[1]: nginx.service: Failed with result 'exit-code'.
11月 17 23:34:13 118-27-106-164 systemd[1]: Failed to start The nginx HTTP and reverse proxy server.

だけどなぜか、ブラウザからwebアクセスしたら問題なく動いている。
phpも問題ない。

なんか変だなと思い最終手段でrebootしたら、、、、改善しました。💦
php7系でcomposer installするとOpenSSL Error
症状
php5.6のCentOSサーバーでcomposer installしようとしたら下記エラーがでた。
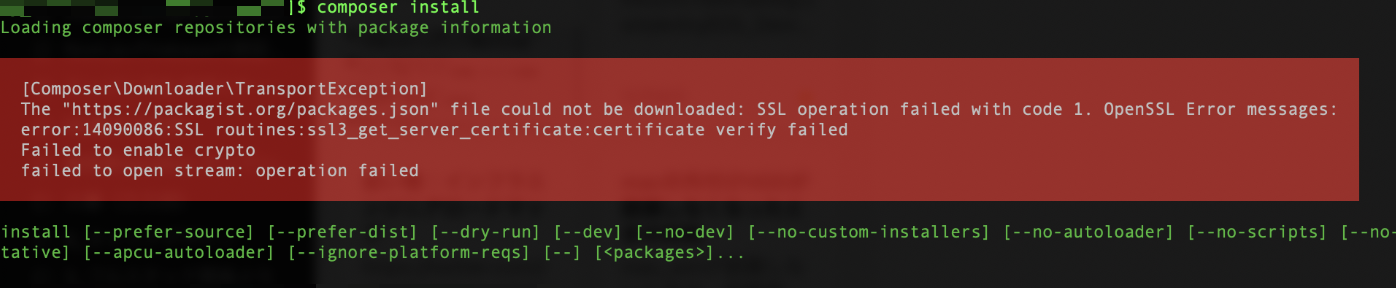
[Composer\Downloader\TransportException]
  The "https://packagist.org/packages.json" file could not be downloaded: SSL operation failed with code 1. OpenSSL Error messages:
  error:14090086:SSL routines:ssl3_get_server_certificate:certificate verify failed
  Failed to enable crypto
  failed to open stream: operation failed
ググったところ、仮想マシンの再起動や、php.iniファイルに
openssl.cafile=/etc/ssl/certs/ca-bundle.crt
を追記すると治るケースがあるという情報がありましたがどちかも解決しませんでした。
改善した方法
結果下記で改善されました。
$ sudo yum install ca-certificates※nginxやphp-fpm等の再起動も反映には必要かもしれません。
その後 composer installが通るようになりました。
Redisのデータを画面で簡易的に操作できるphpRedisAdminをCentOS7+nginxにインストール
いままでphpスクリプトで、redisのデータをいじっていましたが、
さすがに大変なので、GUIで確認できるツールがないかと探したらありました。
phpMyAdminならぬ、phpRedisAdmin!
簡易的にRedisのデータを確認・変更・削除したいなら便利かも!
で、早速インストール方法
こちらの環境で導入した際のメモ ..φ(..)メモメモ
- CentOS7
- nginx + php-fpm
おおもとのドキュメントはこちら(こっちみればええやん汗)
https://github.com/erikdubbelboer/phpRedisAdmin
1. ソースを落とす
git clone https://github.com/ErikDubbelboer/phpRedisAdmin.git
cd phpRedisAdmin
git clone https://github.com/nrk/predis.git vendor
当たり前かもだけど、vendorもcloneしてね
2. あとはドキュメンルートに設定して、ブラウザから見れるようにと、アクセス制限
下記は、/etc/nginx/conf.d/〜〜.conf等に設定
server {

   listen   80;

   server_name phpredisadmin.hogehoge.com;
   root /usr/share/nginx/hoge/;
   index  index.html index.htm index.php;


   location /phpRedisAdmin {
        allow アクセス元IP;
        deny all;
   }


}
無料SSL Let’s encryptを更新した際のメモ
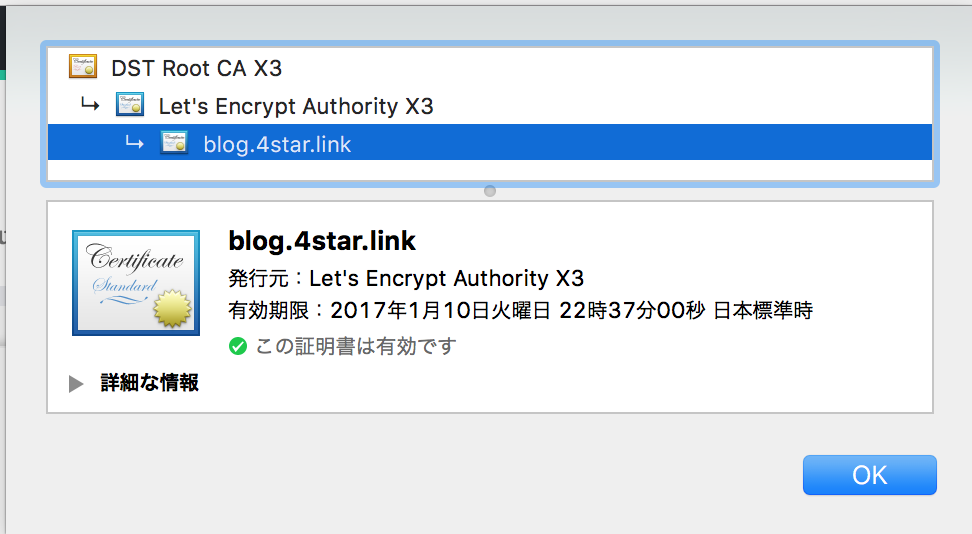
無料SSLで有名なLet’s encryptを、利用させて頂いており、
それの有効期限3ヶ月と短く、その有効期限が迫ったので、更新対応した際のメモ
導入はほぼ200%こちらのサイト様を参考にさせていただきましたm( _ _ ; )m
http://qiita.com/sak_2/items/ff835b669c0a7e110b09
そもそも自動化しろよって話ですが、
手動で更新した際のメモw
1. 恐らく導入時に使ったletsencrypt-autoというファイルを探す。
2. 生成したキーファイル類を確認しておく、必要であればバックアップも
$ cd /etc/letsencrypt/live/blog.4star.link/
cert.pem       chain.pem      fullchain.pem  privkey.pem
3. それぞれのpemファイルがシンボリックで参照されているので、それがnginxで設定しているファイルと同じか確認
cert.pem -> ../../archive/blog.4star.link/cert1.pem
chain.pem -> ../../archive/blog.4star.link/chain1.pem
fullchain.pem -> ../../archive/blog.4star.link/fullchain1.pem
privkey.pem -> ../../archive/blog.4star.link/privkey1.pem
4. で1.のコマンド実行し更新!
$ ./letsencrypt-auto renew
エラーがでた
$ ./letsencrypt-auto renew
Saving debug log to /var/log/letsencrypt/letsencrypt.log

-------------------------------------------------------------------------------
Processing /etc/letsencrypt/renewal/blog.4star.link.conf
-------------------------------------------------------------------------------
Cert is due for renewal, auto-renewing...
Starting new HTTPS connection (1): acme-v01.api.letsencrypt.org
Renewing an existing certificate
Performing the following challenges:
tls-sni-01 challenge for blog.4star.link

-------------------------------------------------------------------------------
Port 443 is already in use by another process. This will prevent us from binding
to that port. Please stop the process that is populating the port in question
and try again.  For automated renewal, you may want to use a script that stops
and starts your webserver. You can find an example at
https://certbot.eff.org/docs/using.html#renewal . Alternatively you can use the
webroot plugin to renew without needing to stop and start your webserver.
-------------------------------------------------------------------------------
Cleaning up challenges
Attempting to renew cert from /etc/letsencrypt/renewal/blog.4star.link.conf produced an unexpected error: At least one of the (possibly) required ports is already taken.. Skipping.

All renewal attempts failed. The following certs could not be renewed:
  /etc/letsencrypt/live/blog.4star.link/fullchain.pem (failure)
1 renew failure(s), 0 parse failure(s)
必要なポートが既に使われているらしい。
ポートチェック
$ netstat -tanplsof -i:80
nginxで使っているので一旦停止(サービスが止まるので注意!
$ service nginx stop
再びrenew!
$ ./letsencrypt-auto renew
Saving debug log to /var/log/letsencrypt/letsencrypt.log

-------------------------------------------------------------------------------
Processing /etc/letsencrypt/renewal/blog.4star.link.conf
-------------------------------------------------------------------------------
Cert is due for renewal, auto-renewing...
Starting new HTTPS connection (1): acme-v01.api.letsencrypt.org
Renewing an existing certificate
Performing the following challenges:
tls-sni-01 challenge for blog.4star.link

-------------------------------------------------------------------------------
Port 443 is already in use by another process. This will prevent us from binding
to that port. Please stop the process that is populating the port in question
and try again.  For automated renewal, you may want to use a script that stops
and starts your webserver. You can find an example at
https://certbot.eff.org/docs/using.html#renewal . Alternatively you can use the
webroot plugin to renew without needing to stop and start your webserver.
-------------------------------------------------------------------------------
Cleaning up challenges
Attempting to renew cert from /etc/letsencrypt/renewal/blog.4star.link.conf produced an unexpected error: At least one of the (possibly) required ports is already taken.. Skipping.

All renewal attempts failed. The following certs could not be renewed:
  /etc/letsencrypt/live/blog.4star.link/fullchain.pem (failure)
1 renew failure(s), 0 parse failure(s)
また同じエラーが。。。
さらにもう一回!
どりゃっっxさらにもう一回!
ぐああーーっしゃいさらにもう1っかい!
。。。。
。。。。。
何度か同じエラーがでたあと、
$ ./letsencrypt-auto renew
Saving debug log to /var/log/letsencrypt/letsencrypt.log

-------------------------------------------------------------------------------
Processing /etc/letsencrypt/renewal/blog.4star.link.conf
-------------------------------------------------------------------------------
Cert is due for renewal, auto-renewing...
Starting new HTTPS connection (1): acme-v01.api.letsencrypt.org
Renewing an existing certificate
Performing the following challenges:
tls-sni-01 challenge for blog.4star.link
Waiting for verification...
Cleaning up challenges
Generating key (2048 bits): /etc/letsencrypt/keys/0001_key-certbot.pem
Creating CSR: /etc/letsencrypt/csr/0001_csr-certbot.pem

-------------------------------------------------------------------------------
new certificate deployed without reload, fullchain is
/etc/letsencrypt/live/blog.4star.link/fullchain.pem
-------------------------------------------------------------------------------

Congratulations, all renewals succeeded. The following certs have been renewed:
  /etc/letsencrypt/live/blog.4star.link/fullchain.pem (success)
成功ーーーーーーー!
最高ーーーーーーー!
わっほい!
で
$ service nginx start
証明書が更新されていない。。。。
生成されたpemファイルをチェック。。。
pemが複数連番になってつくられている、、
/archive/blog.4star.link/cert1.pem
/archive/blog.4star.link/cert2.pem
僕の場合archiveのファイルをnginx.confに指定していたので、
生成された番号のつきの名前の方を変更。。
人力でファイルを変更。。。w
nginx.conf
ssl_certificate /etc/letsencrypt/archive/blog.4star.link/fullchain**2**.pem;
ssl_certificate_key /etc/letsencrypt/archive/blog.4star.link/privkey**2**.pem;
ssl_trusted_certificate /etc/letsencrypt/archive/blog.4star.link/fullchain**2**.pem;
あとは、
せいや。。。!!!!
$ service nginx start

成功done!
php7にしたらphp7からRedisが呼び出せなくなった時のメモ
よくある下記からphpからredisを使えるようにする処理のところで、
$redis = new Redis();
こういうphpエラーがでる。
PHP message: PHP Fatal error: Uncaught Error: Class 'Redis' not found in /usr/share/nginx〜
今回の環境構成は、
で
yumで、全てインストールできるようにこだわっていたのですが、
なぜかphp7からredisがよびだせず、ちなみに、コンソールで、
redis-cliなどでredisを動かすことはできている。。
php5系の時は普通に動いていたのですが、
php-redis等のモジュールを系を入れ替えしてためしてみると、
yum install --enablerepo=epel,remi-php70 php70-php-pecl-redis
ではだめでしたが、
yum install --enablerepo=epel,remi-php70 php-pecl-redis
で、無事php7からredisを呼び出せるようになった。。
依存関係ハマりやすい。
Cakephp3をCentOS7( php7 + php-fpm + nginx + MySQL )にインストールした際のメモ
大分出遅れた感がありますが、最近cakephp3のサービスを構築したので、
それを兼ねてメモ。
早速、cakephp3の公式サイトでインストール方法を確認。
http://book.cakephp.org/3.0/ja/installation.html
システム要件を確認すると。。。
システム要件
HTTPサーバー。例: Apache。mod_rewrite が推奨されますが、必須ではありません。
PHP 5.5.9 以上 (PHP 7 も含む)
PHP mbstring 拡張
PHP intl 拡張
…(PHP 7も含む)!
せっかくなので、速いとウワサのphp7に、php-fpmと、nginxの構成で、
yumでインストールしてみました!!
はじめてのCentOS7 セットアップめもw
CentOS7にのりかえて、ちょっと焦ったのでめも。
ちょっと触ると逆に6よりわかりやすいかもw
※rpmforage
# rpm -ivh http://apt.sw.be/redhat/el7/en/x86_64/rpmforge/RPMS/rpmforge-release-0.5.3-1.el7.rf.x86_64.rpm
※epel
# rpm -ivh http://dl.fedoraproject.org/pub/epel/7/x86_64/e/epel-release-7-5.noarch.rpm
※remiを追加
# rpm -ivh http://rpms.famillecollet.com/enterprise/remi-release-7.rpm
yumをアップデート
# yum update
nginx + php-fpm + redis のインストール
CentOS7から デフォルトでserviceコマンドではなく、systemctlコマンドでサービスを管理するようになった。
nginxのインストール
# yum install nginx
# systemctl status nginx.service
# systemctl start nginx.service
# systemctl enable nginx.service
※php-fpm.d/www.conf のuser と group を apahce → nginx へ
php-fpmのインストール
# yum install php-fpm php-mbstring php-gd  php-mysql php-redis
# systemctl status php-fpm.service
# systemctl start php-fpm.service
# systemctl enable php-fpm.service
redisのインストール
# yum install redis
# systemctl status redis.service
# systemctl start redis.service
# systemctl enable redis.service