CentOS6.5にvagrantをインストールしsshまで汗

1. VirtualBox インストール

# cd /etc/yum.repos.d/
# wget http://download.virtualbox.org/virtualbox/rpm/rhel/virtualbox.repo
# yum list | grep VirtualBox
# yum install VirtualBox-4.3

2. Vagrantつっ込む

# rpm -Uvh http://files.vagrantup.com/packages/a40522f5fabccb9ddabad03d836e120ff5d14093/vagrant_1.3.5_x86_64.rpm

3. Vagrant box の追加

# vagrant box add centos http://developer.nrel.gov/downloads/vagrant-boxes/CentOS-6.5-i386-v20140504.box

4. VMの格納先とVagrantfileの作成

# mkdir centos6.5_VM
# cd centos6.5_VM
# vagrant init centos

5. vagrant upで仮想環境(VM)を構築

# cd centos6.5_VM
# vagrant up

僕の場合、conohaの格安VPSをつかっていたため、起動のタイムアウト上限をこえて起動できなかったので、

# vim Vagrantfile 

で、

 12   # Every Vagrant virtual environment requires a box to build off of.
 13   config.vm.box = "centos"
 14 
 15   # ここ追加
 16   config.vm.boot_timeout = 3600

config.vm.boot_timeout = 3600 を追記し、
途中でこけないようにしました。

6. 仮想環境(VM)へのsshアクセス

ssh アクセス

# vagrant ssh

VMの停止

# vagrant halt

VMの破棄

# vagrant destroy

以上!参考になれば幸いです。
はじめてのCentOS7 セットアップめもw

CentOS7にのりかえて、ちょっと焦ったのでめも。
ちょっと触ると逆に6よりわかりやすいかもw

※rpmforage

# rpm -ivh http://apt.sw.be/redhat/el7/en/x86_64/rpmforge/RPMS/rpmforge-release-0.5.3-1.el7.rf.x86_64.rpm

※epel

# rpm -ivh http://dl.fedoraproject.org/pub/epel/7/x86_64/e/epel-release-7-5.noarch.rpm

※remiを追加

# rpm -ivh http://rpms.famillecollet.com/enterprise/remi-release-7.rpm

yumをアップデート

# yum update

nginx + php-fpm + redis のインストール

CentOS7から デフォルトでserviceコマンドではなく、systemctlコマンドでサービスを管理するようになった。

nginxのインストール

# yum install nginx
# systemctl status nginx.service
# systemctl start nginx.service
# systemctl enable nginx.service

※php-fpm.d/www.conf のuser と group を apahce → nginx へ

php-fpmのインストール

# yum install php-fpm php-mbstring php-gd  php-mysql php-redis
# systemctl status php-fpm.service
# systemctl start php-fpm.service
# systemctl enable php-fpm.service

redisのインストール

# yum install redis
# systemctl status redis.service
# systemctl start redis.service
# systemctl enable redis.service

Unity toon shader(トゥーンシェーダー)で、iphone,androidの実機が陰影がついてしまう

環境:Unity4.6 MacOSX yosemite

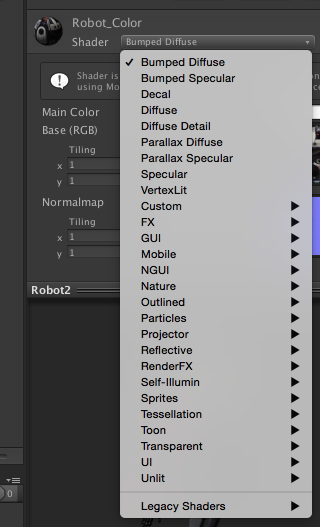
Unityの便利な機能toonで、アニメ調に3Dモデルを表示をしたい時

スクリーンショット 2015-06-10 8.59.20

でいろんなタイプの設定が可能。

陰影をなくしたり、枠線をつけたり。
高機能!

ただそのまま、iPhone端末や、Android端末の実機で実行すると、陰影がなくしたはずなのに、適応されてない!!

そんな時は、iphoneとandroidである、プラットフォーム別の設定を変えてみると、
無事実機でも反映されておりました!

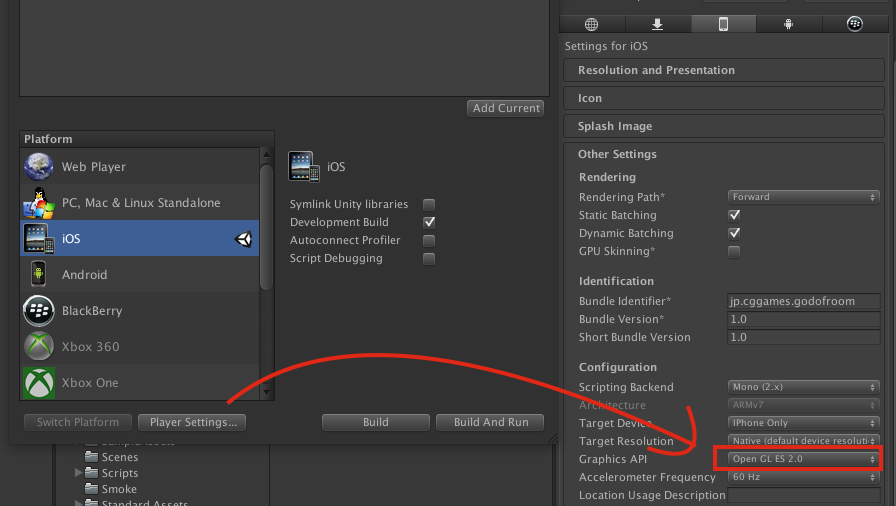
iOS / Android のPlayer Settingをいじる

スクリーンショット 2015-06-10 9.06.09

PlayerSettingsの、
Graphics API を[automatic]から[Open GL ES 2.0]に変更すると無事、実機でも反映確認できました。
Androidも同様な設定項目があるので同じく設定

参考になれば幸いです!!!

Kinect等で作成したBVHファイルを圧縮簡易化する方法

Kinect等で、モーションデータBVHをblenderにインポートすると、データが膨大になってしまう。
またその原因は1フレーム単位でモーションデータが入っているため。
指等の動きをあわせるとデータどんどん膨大になっていく。
なのでそのための対処。

  1. Blenderで、BVHファイルをインポートする。

  2. 取り込んだアニメーションを確認し、「dope sheet」とgraph editor」で圧縮前のデータ量を確認。

  3. こちらのサイトを参考にsimply curveというモーションデータを圧縮簡易化するツールを使う。
    http://silverspirecg.blog119.fc2.com/blog-entry-75.html

    ありがとうございます!!m(_ _)m

圧縮率を指定し、問題ないレベルまでアニメーションを簡易するする。
個人的にはerror:0.8とかで、いい感じで簡易された。

  1. あとは、「dope sheet」と「graph editor 」を使って実作業!

CentOS6.5に docker + fig のインストール

まずdockeryumでインストール

$sudo yum install docker
$sudo docker --version

次にfigをインストール

curlでインストール

$sudo sh -c "curl -L https://github.com/docker/fig/releases/download/0.5.2/linux > /usr/bin/fig"
$sudo chmod +x /usr/bin/fig
$sudo fig --version 

僕の場合これで下記のようなエラーになったが、

fig: /lib64/libc.so.6: version `GLIBC_2.14' not found (required by /tmp/_MEIieSV5R/libz.so.1)

pipでインストールすると

$sudo yum install python-pip
$sudo pip install -U fig
$fig --version
fig 1.0.1

おお、成功!!

あとはfig.ymlなどつくって、fig up

Unity C# で文字列をfloatに変換

Unity C# で文字列をfloatに変換

//string floatVal = “10.0f”; // NG
string floatVal = “10.0”;

float playerX = float.Parse (floatVal);

stringの時点でfを入れてしまうとエラーになるので注意!

wordpressでrobots.txtがnginxで表示されない場合の対処

nginxで、wordpressのプラグイン「XML-Sitemap」でrobots.txtが表示されない

http://hoge.com/robots.txt にアクセスしてrobots.txtが「404 Not Found」になってしまう

wordpressをnginxの環境でセットアップしていると、
XML-Sitemapで自動生成されるrobots.txtがで表示されないようです。
apacheの場合は特に意識しなくても大丈夫かと思いますが。

色々とググってみましたが、日本の記事がなかったので、
メモとして残します。

実は、「http://hoge.com/index.php?robots=1」にアクセスすると
robots.txtの内容が表示されます。
なのでrewriteしちゃいます。

nginxで動的にrobots.txtを表示する設定

/etc/nginx/conf.d/hoge.conf

server {
  listen 80; 

 〜省略〜

  # nginxとwordpressだと自動生成されるrobotsが404になるのを防ぐ
  location = /robots.txt {
    rewrite ^/robots\.txt$ /index.php?robots=1 last;
    allow all;
    log_not_found off;
    access_log off;
  }

   〜省略〜

あとはnginxを再起動

$sudo service nginx configtest
$sudo service nginx restart

実際に「http://hoge.com/robots.txt」の設定確認

User-agent: *
Disallow: /wp-admin/

Sitemap: http://blog.4star.link/index.php?xml_sitemap=params=

上記のように反映されていればOK
シンプル!

curlやwgetでhttpsにアクセスすると拒否られる対処

〜s certificate, issued by 〜 Unable to locally verify the issuer’s authority.

〜の検証に失敗しました: 発行者の権限を検証できませんでした〜

とでる場合は、

http://d.hatena.ne.jp/hogem/20120705/1340284071
こちらを参考にさせて頂きました!
うまいぼうblogさんありがとうございます1

CentOSの場合はこちらで対応できたのですが、 FreeBSDは、

ルート証明書インストール
#pkg install security/ca_root_nss
シンボリックリンクを貼る
#ln -s /usr/local/share/certs/ca-root-nss.crt /etc/ssl/cert.pem

※pkg install等パッケージ管理ソフトを別ものなど利用している場合は、ソースインストール等、
別の方法とる。

下記のようなエラーがでる場合

asn1 encoding routines:ASN1_item_verify:unknown message digest algorithm

opensslのバージョンが古い事が問題なので、
opensslのバージョンを上げる。

OpenSSLのバージョン確認
$ sudo rpm -qa | grep openssl

OpenSSLアップデート
$ sudo yum update opensll openssl-devel

Unityでレンズを通したような魚眼にする方法

Unity Proにはデフォルトで、
カメラから通した映像を魚眼風に屈折させることができるようです。

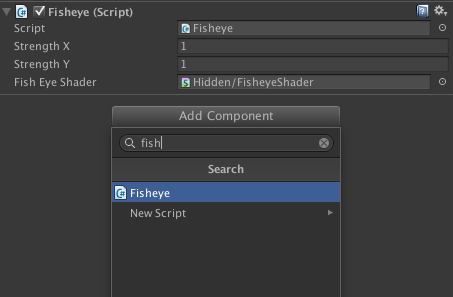
やり方は簡単、カメラのコンポート追加にて、
Fisheys」を追加するだけ。

スクリーンショット 2015-05-13 18.21.46

Strength X、Strength Yで屈折の強度を指定できます!
Unityすごし!

vagrantでcentos6を入れてsshで接続

vagrant,virtualboxが入っている事前提。

vagrantbox
を使って、
centos6のboxファイルを探す。

vagrant box add centos6 https://github.com/2creatives/vagrant-centos/releases/download/v6.5.3/centos65-x86_64-20140116.box

保持されてるboxのリスト

vagrant box list

先ほどaddしたcentos6を初期化(Vagrantfileが作られる)

vagrant init centos6

仮想起動

vagrant up

仮想へssh接続

vagrant ssh 

centos6が入っているか確認

[vagrant@vagrant-centos65 ~]$ cat /etc/redhat-release 
CentOS release 6.5 (Final)

参考:vagrantコマンド詳細